Reading Time: 8 minutes
WordPress is a World’s most popular Content Management system ( CMS ). A website After complete setup, a very important part of setup your website security. Today I explain and give you some suggestions for protecting your WordPress blog or any type of WP website. How to secure WordPress Website with plugin also without any plugins.
I have some suggestions which I have given some things here:
- Always update WordPress to the latest version
- Keep WordPress Themes & Plugins Updated
- Use Latest PHP Version
- Delete any themes that you’re not using
- Enable Plugins and Theme Auto Update
- Blocking some specific IP addresses from accessing your site
- Control access to the wp-admin folder
- Use Clever Username and Password
- Limit WordPress Login Attempts
- Use Pre-Login CAPTCHAs ( reCAPTCHAs )
- Use A Reliable & Secure Hosting Company
- Always Backup Your WordPress Website
- Add Basic HTTP Authentication (htpasswd protection)
- Use HTTPS for Encrypted Connections – SSL Certificate
- Harden Your wp-config.php file
- Change wp-config.php file Permissions 400 or 440
- Disable XML-RPC
- Disable File Editing in WordPress Dashboard
- Hide Your WordPress Version
- DDoS Protection ( Cloudflare )
- Hide The Plugins Directory
How to Update WordPress Core
Login your WordPress Website, Go to Dashboard > Updates or click Please update now to go to the Updates screen and begin the process.
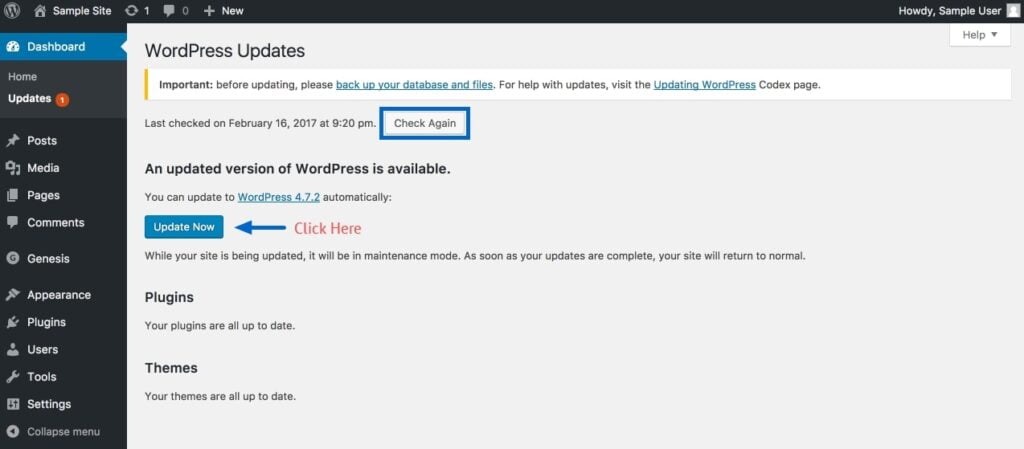
If you don’t see any update notice the update list is empty but you recognize there’s a new version of WordPress available, click Check Again to refresh the list, When the update appears, click Update Now to update WordPress.
How to update WordPress Themes
Just login your WordPress site then navigate to Dashboard >> Appearance >> Themes, pick the current theme, then simply click the button “Update Now” to attempt the upgrade. That’s done, as easy as it sounds. also, you can do it manually.
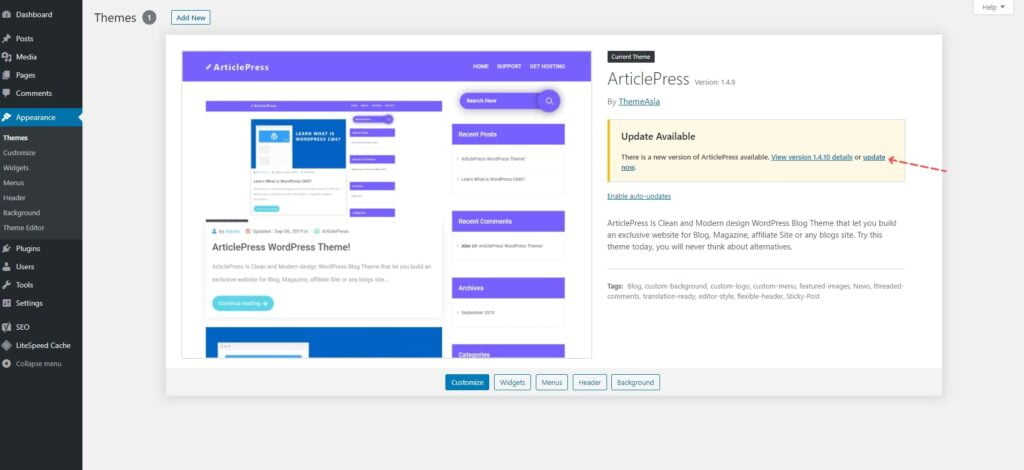
Updates are really important for the security and performance of your WordPress website.
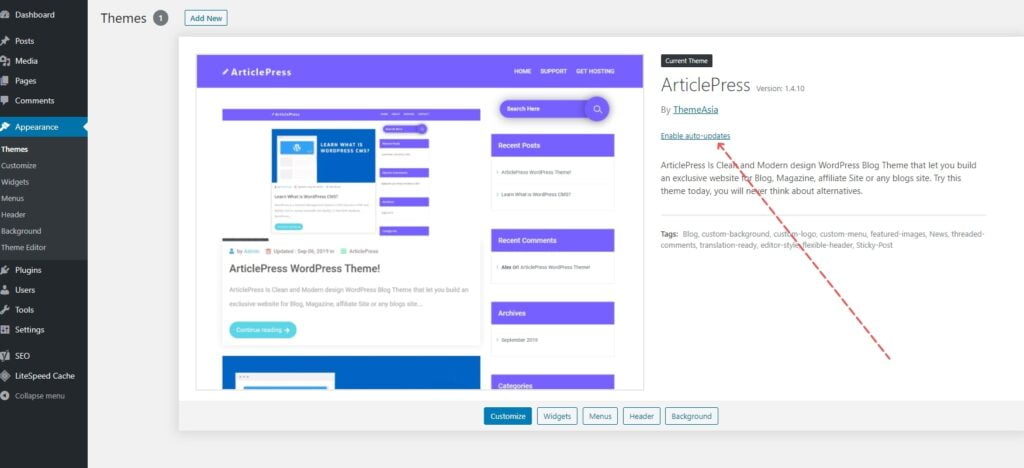
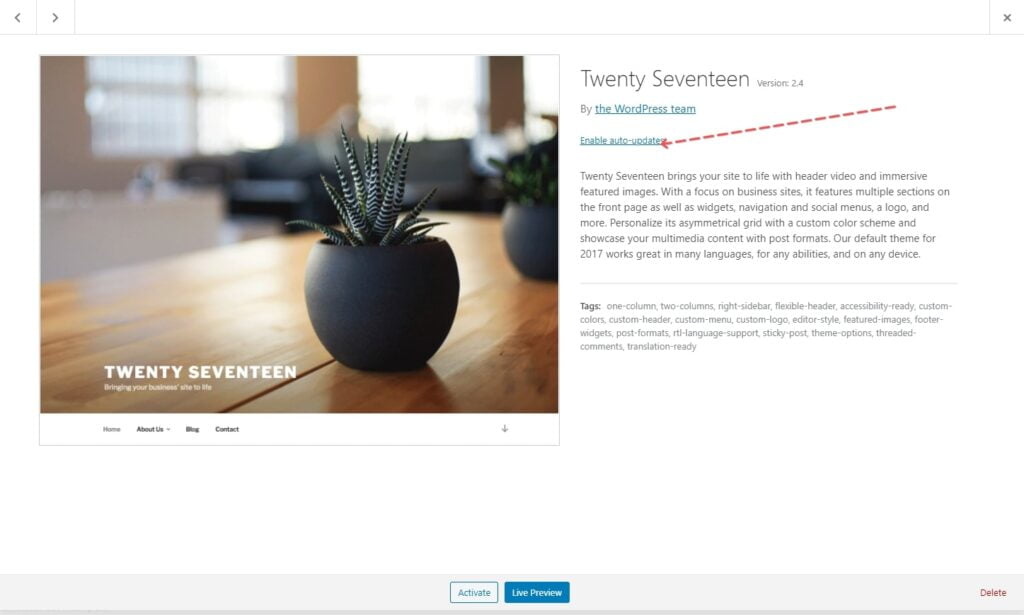
Also, you can enable WordPress Theme auto-update, Just click the Enable auto-updates button, then when you will get any theme update it will update automatically.
How to Update WordPress Plugins
That is the same for Theme update and Plugin update Just login your WordPress site then navigate to Dashboard >> Appearance >> Plugins, then simply click the button “Update Now” to attempt the upgrade. That’s done, if you need multiple plugin update you can select the plugin list then click as easy as it sounds. also, you can do it manually.
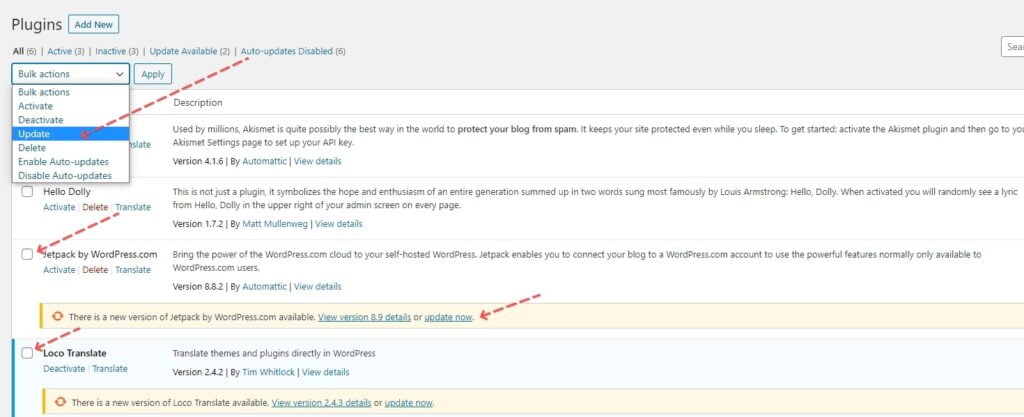
Plugins Updates are really important for the security and performance of your WordPress website.
How to change PHP version from cPanel
We will try on cPanel but, if you use other’s control panel please follow other’s control panel documentation.
Login your cPanel > search PHP Version
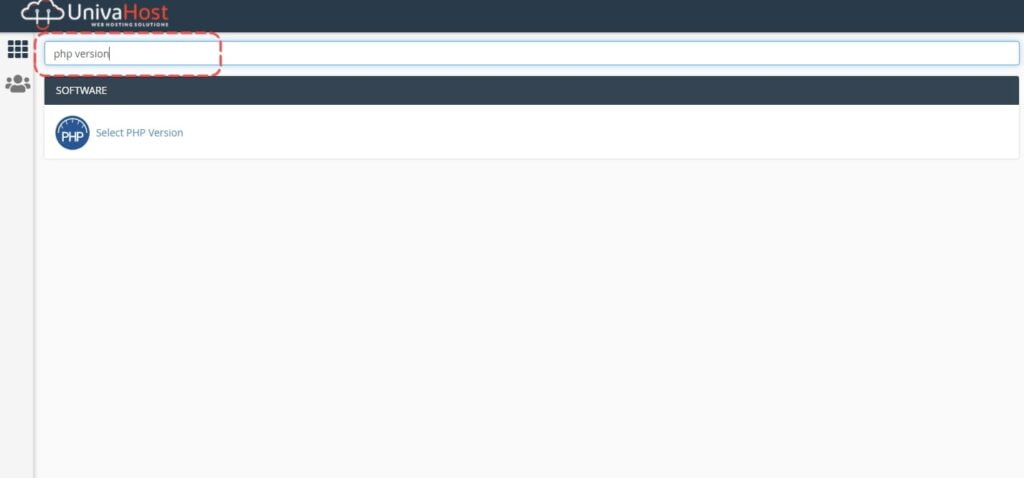
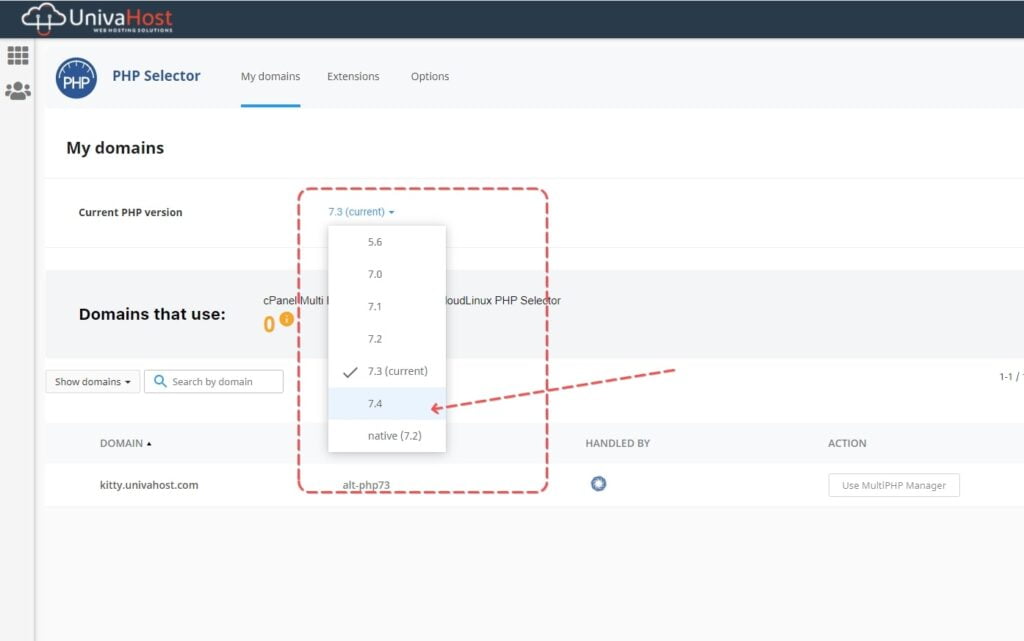
Click Select PHP Version > click latest last update version
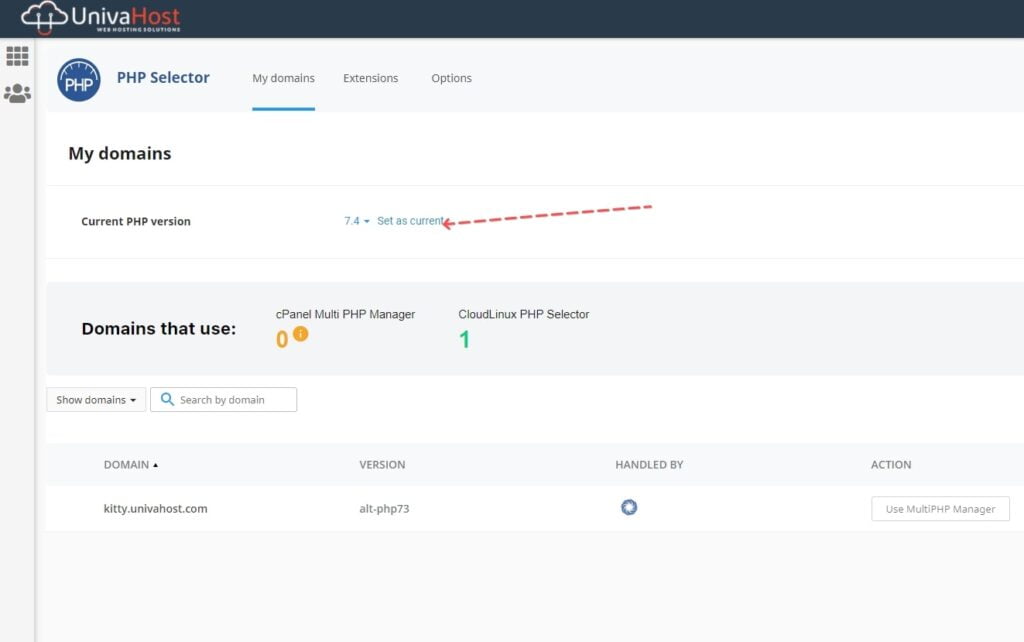
Now click Set as current Button after click the button your website version will change
Also, you can check the Video Tutorial How to change PHP version from cPanel
How to Delete any themes that you’re not using
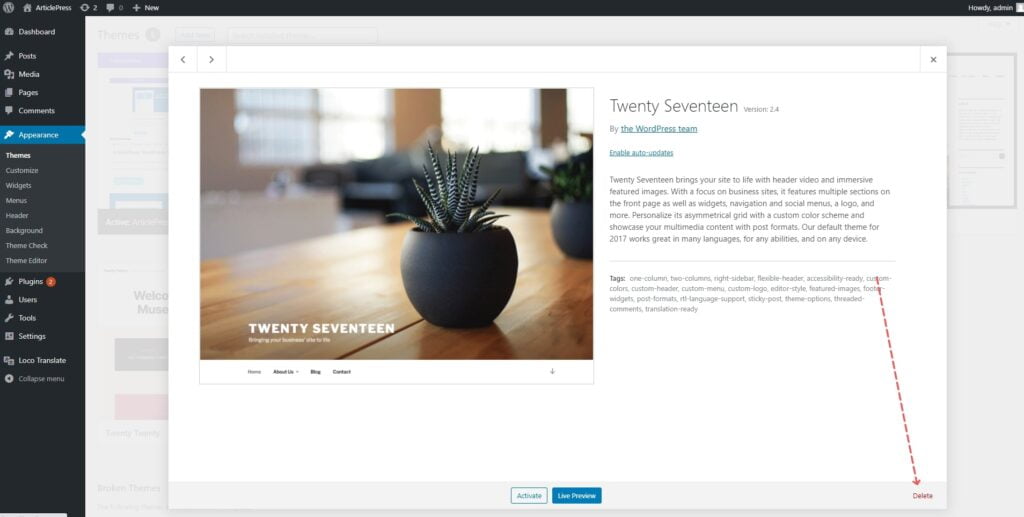
In your WordPress site, go to Appearance > Themes. You’ll see all of your installed themes displayed with the active one first in the list. Click the Theme Details button.
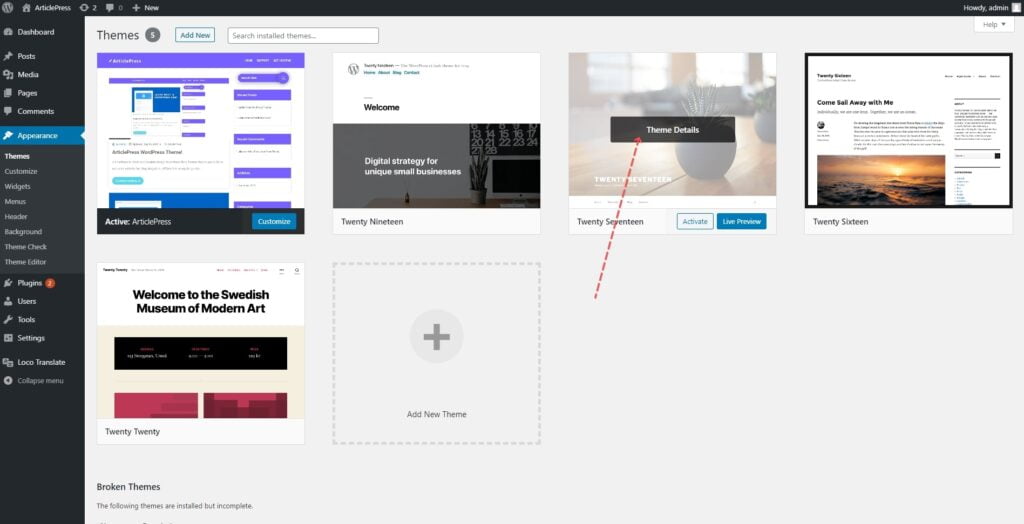
In the lower right-hand corner, there’s a Delete link Button. click this button then you will get a alert if you really need to delete this theme you can select OK otherwise click the cancel.
How to enable auto-update WordPress plugins and themes
WordPress 5.5 version release A new feature that will allow automatic updating of plugins and themes will be available in WordPress version 5.5, which is scheduled to be released on August 11, 2020.
Below are screenshots of how these new auto-update options will look like, once development ends.
In your WordPress site, go to Appearance > Themes. You’ll see all of your installed themes displayed with the active one first in the list. Click the Theme Details button.
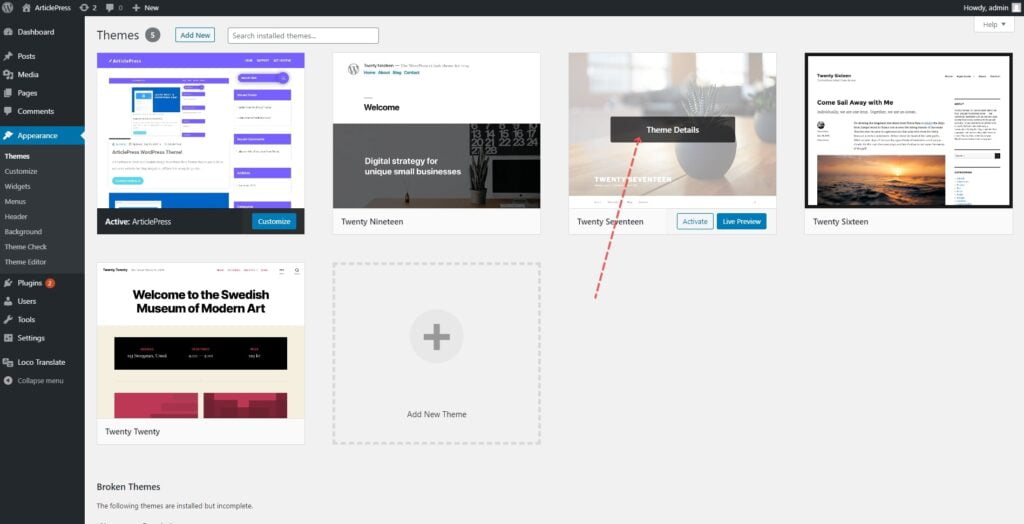
Now click the Enable auto-update url Button
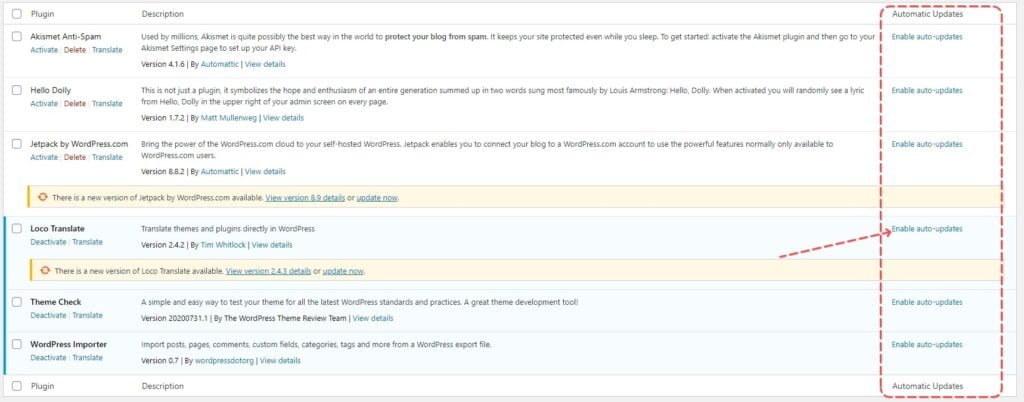
Now we enable WordPress Plugins Auto-update. In your WordPress site, go to Appearance > Plugins. You’ll see all of your installed plugins displayed.
Click the Enable auto-updates URL Button
How to Edit or create .htaccess file
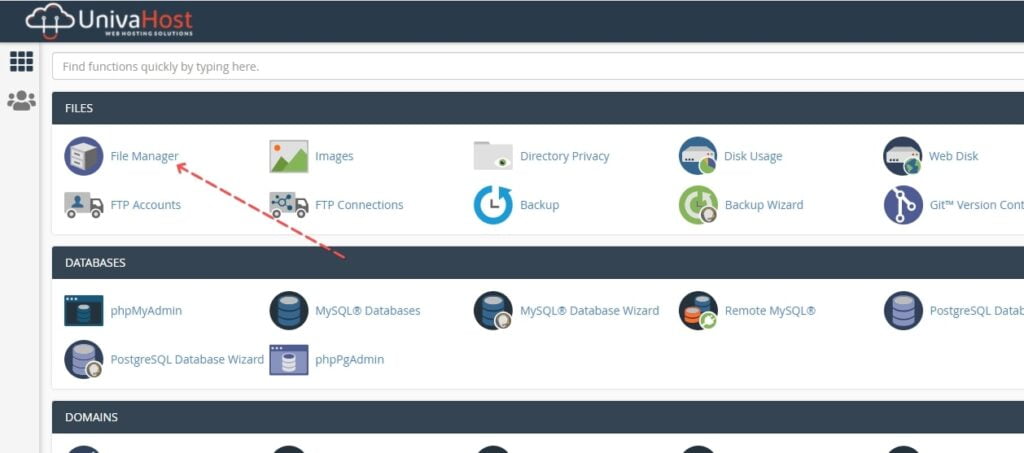
1.Login your cPanel and click File manager
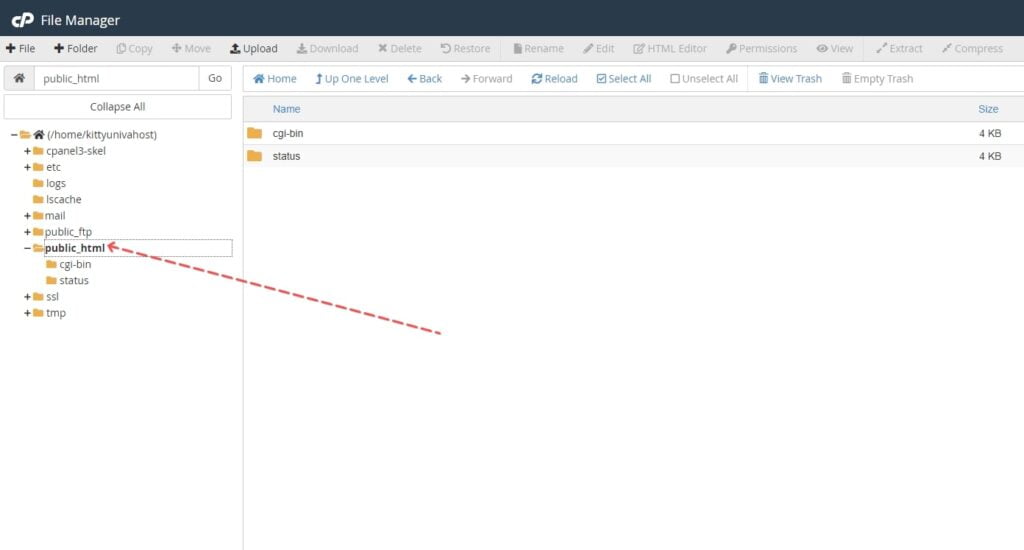
2. Now Click Public_html
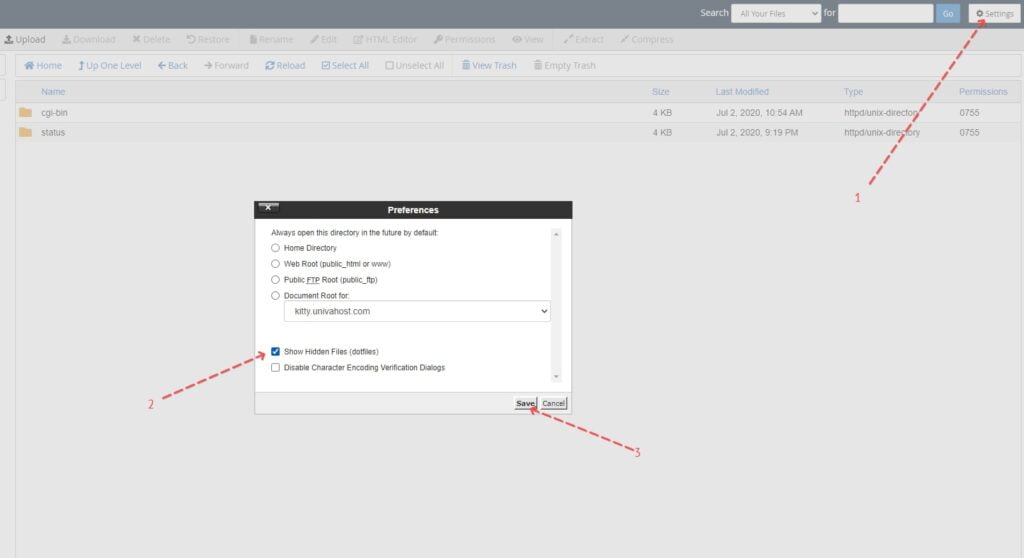
3. Click Settings > Check Show Hidden Files (dotfiles) > Save
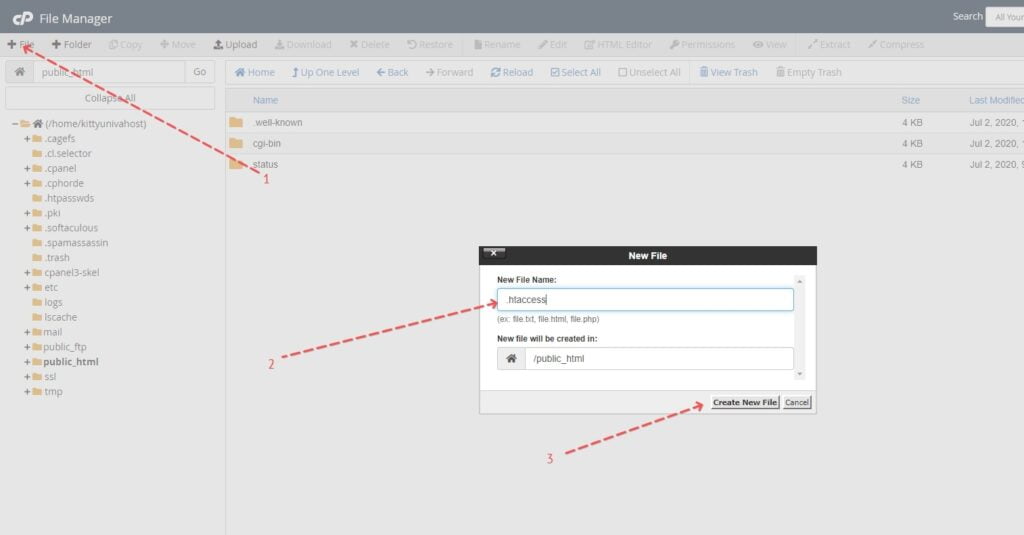
4. Now we need to create a .htaccess file, Click File > Enter your file name .htaccess > Click Create New File button
5. How to open htaccess file and edit or add code
Select .htaccess file > Click Edit button > Now show a alert box Back up the original file before converting character sets, since this action can produce unexpected results. you can click again click Edit button.
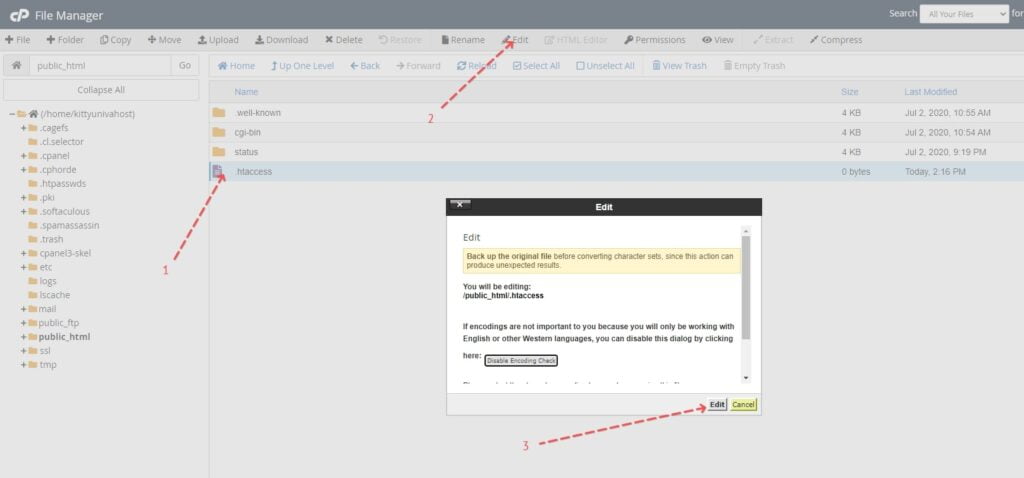
6. Now you can see a Code editor here you can write your .htaccess code after write your code you can just click Save Changes button.
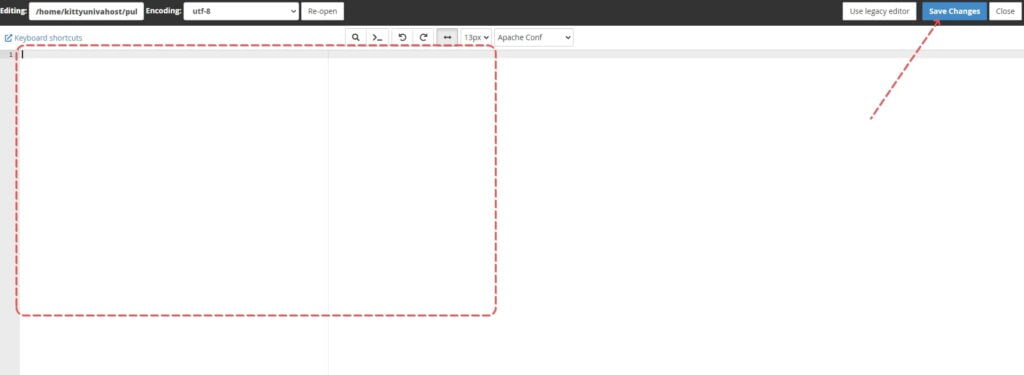
Also, you can follow the video tutorial how to create .htaccess file and how to add .htaccess code
How to protect your .htaccess file
Open your .htaccess file and copy and paste on your .htaccess file below the code. Now that we have secured the .htaccess file.
# Deny access to .htaccess
<Files .htaccess>
    Order allow,deny
    Deny from all
</Files>
Blocking some specific IP addresses from accessing your site
You can unauthorized WordPress user access by blocking his IP address from ever accessing your site using the .htaccess file.
123.456.77.9 The IP address that is in the code above is just a dummy. You can substitute these values with the IP address that you wish to block.
<Limit GET POST>
    order allow,deny
    deny from 123.456.77.9
    allow from all
</Limit>
If you want to deny access to any block of IP addresses, simply omit the last of the octet as shown below.
deny from 123.456.78.9
How to Control access your WordPress wp-admin folder
Open your .htaccess file and add this code on your .htaccess file. 12.34.56.78 this IP address is dummy, you can replace this IP you and add your own IP address here allow from 12.34.56.78
# Limit logins and admin by IP
<Limit GET POST PUT>
    order deny,allow
    deny from all
    allow from 12.34.56.78
</Limit>
Secure your wp-includes folder using the .htaccess code
Using this code you can secure your Wp-Include folder wp-includes folder just copy the code and paste on your .htaccess file
<IfModule mod_rewrite.c>
    RewriteEngine On
    RewriteBase /
    RewriteRule ^wp-admin/includes/ - [F,L]
    RewriteRule !^wp-includes/ - [S=3]
    RewriteRule ^wp-includes/[^/]+\.php$ - [F,L]
    RewriteRule ^wp-includes/js/tinymce/langs/.+\.php - [F,L]
    RewriteRule ^wp-includes/theme-compat/ - [F,L]
</IfModule>
How to WordPress Disable directory listing
Just use the code on your .htaccess file, this code is disable WordPress directory listing
Options -IndexesHow to Disable all PHP files in your uploads folder
You can Disable all php files in your uploads folder, just add the code on your .htaccess file.
<Files *.php>
    deny from all
</Files>
How to Disable Access to XML-RPC
Login your cPanel Go to File Manager > public_html > find .htaccess file and open your editor the please this code on your .htaccess file
<FilesMatch "^(xmlrpc\.php)">
    Order Deny,Allow
    Deny from all
</FilesMatch>
How to Secure the wp-config.php File
Change your WordPress wp-config.php file permission and Set the file permissions to 600 so that only true owners can edit the wp-config file.
Now paste the .htaccess code on your .htaccess file to prevent hackers from loading the wp-config.php file directly from the browser.
<files wp-config.php>
    order allow,deny
    deny from all
</files>
How to Disallow file editing from WordPress Dashboard
Login your cPanel Go to File Manager > Public_html > Find wp-config-.php file and open your editor, now copy below the code and pest your wp-config.php file. This code is disabled to edit your Website file form WordPress Dashboard.
define('DISALLOW_FILE_EDIT', true);How to Force Secure Login
Login your cPanel Go to File Manager > Public_html > Find wp-config-.php file and open your editor, now copy below the code and pest your wp-config.php file. This code is force your user HTTP to HTTPS.
define( 'FORCE_SSL_ADMIN', true );How to Disable Plugin and Theme Modifications
If you want to update plugins and themes as a WordPress admin use DISALLOW_FILE_EDIT.
define( 'DISALLOW_FILE_EDIT', true );This code is totally disabled plugin and theme background update and file edit, if you use this code DISALLOW_FILE_MODS you need to update plugin from FTP/SFTP.
define( 'DISALLOW_FILE_MODS', true );How to Disallow Unfiltered HTML
if you need to Disallow Unfiltered HTML you can use this code but not recommended always.
define( 'DISALLOW_UNFILTERED_HTML', true );Limit Login Attempts in WordPress Without Any Plugin
Using this code you can restrict WordPress login attempts in WordPress by adding custom code in your function.php file, there is no need to use any plugin.
function check_attempted_login( $user, $username, $password ) {
    if ( get_transient( 'attempted_login' ) ) {
        $datas = get_transient( 'attempted_login' );

        if ( $datas['tried'] >= 3 ) {
            $until = get_option( '_transient_timeout_' . 'attempted_login' );
            $time = time_to_go( $until );

            return new WP_Error( 'too_many_tried',  sprintf( __( '<strong>ERROR</strong>: You have reached authentication limit, you will be able to try again in %1$s.' ) , $time ) );
        }
    }

    return $user;
}
add_filter( 'authenticate', 'check_attempted_login', 30, 3 );
function login_failed( $username ) {
    if ( get_transient( 'attempted_login' ) ) {
        $datas = get_transient( 'attempted_login' );
        $datas['tried']++;

        if ( $datas['tried'] <= 3 )
            set_transient( 'attempted_login', $datas , 300 );
    } else {
        $datas = array(
            'tried'     => 1
        );
        set_transient( 'attempted_login', $datas , 300 );
    }
}
add_action( 'wp_login_failed', 'login_failed', 10, 1 );

function time_to_go($timestamp)
{

    // converting the mysql timestamp to php time
    $periods = array(
        "second",
        "minute",
        "hour",
        "day",
        "week",
        "month",
        "year"
    );
    $lengths = array(
        "60",
        "60",
        "24",
        "7",
        "4.35",
        "12"
    );
    $current_timestamp = time();
    $difference = abs($current_timestamp - $timestamp);
    for ($i = 0; $difference >= $lengths[$i] && $i < count($lengths) - 1; $i ++) {
        $difference /= $lengths[$i];
    }
    $difference = round($difference);
    if (isset($difference)) {
        if ($difference != 1)
            $periods[$i] .= "s";
            $output = "$difference $periods[$i]";
            return $output;
    }
}
How to Hide WordPress Version Number from Generator Meta Tag
Just add this hook code on you function.php file To hide the WordPress version number from the Generator meta tag. Login your cPanel go to File Manager > plublic_html > theme > find your theme folder name and open > then find function.php file
remove_action('wp_head', 'wp_generator');Also, you can use a security plugin, Here is the top 5 WordPress Security Plugins
- All In One WP Security & Firewall
- Wordfence Security – Firewall & Malware Scan
- iThemes Security (formerly Better WP Security)
- Sucuri Security – Auditing, Malware Scanner
- Security Ninja – Secure Firewall & Secure Malware Scanner
This article we try to cover WordPress all security topics if you have any questions just comment below. Thank you for reading this article.
A Best WordPress security article
I recommend that you use WP Cerber plugin to protect you site.