Reading Time: 4 minutes
In our digitally connected world, email is a primary mode of communication, and securing your email is paramount. Email spoofing, phishing, and unauthorized use of your domain can pose significant threats. To fortify your email security and ensure trusted email delivery, you need DMARC (Domain-based Message Authentication, Reporting, and Conformance). In this comprehensive guide, we’ll show you how to set up DMARC through UnivaHost’s cPanel, which can automatically generate DMARC records, and we’ll also provide instructions for those who prefer manual DNS configuration. Learn how to “Setup DMARC for Email Delivery” and bolster your email security.
Method 1: Setting Up DMARC via UnivaHost’s cPanel (Automatic Configuration)
Step 1: Access UnivaHost’s cPanel
To get started, log in to UnivaHost’s cPanel, your gateway to managing your web hosting environment, including your DNS records where you’ll establish the DMARC record.
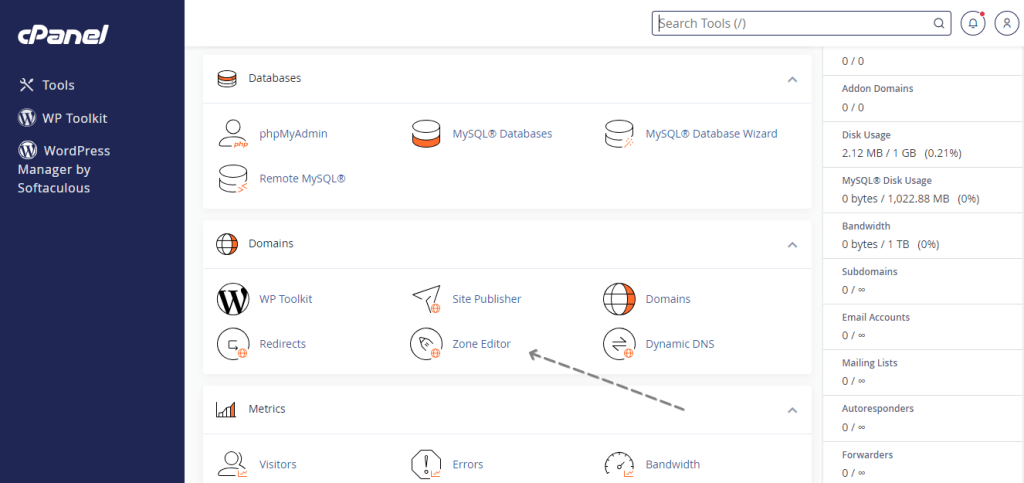
Step 2: Find the Zone Editor
Within cPanel, look for the “Zone Editor” or similar features, which provide access to your domain’s DNS settings.

Step 3: Adding the DMARC Record
Now, let’s add your DMARC record by following these steps:
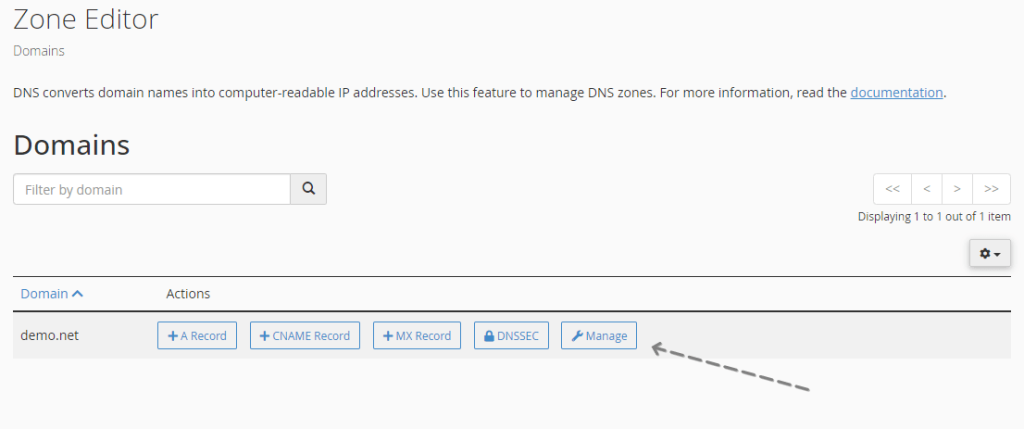
1. Click Managed: Begin by selecting the “Managed” option. This is where you’ll create and manage DNS records.

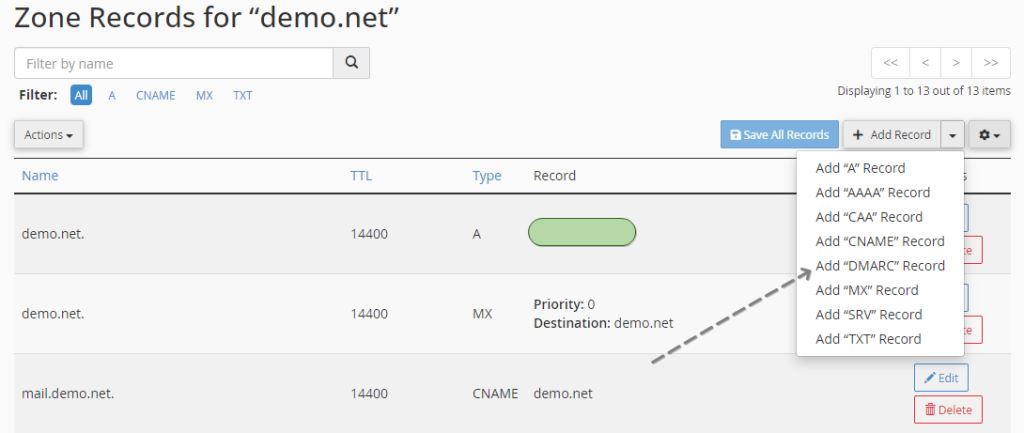
2. Add Record: Look for the “Add Record” button, typically represented by a plus or similar symbol.

3. Select DMARC: Under the “Type” or “Record Type” dropdown menu, choose “DMARC.”
4. Automated DMARC Generation: The UnivaHost cPanel will automatically generate the DMARC record for you. No need to manually enter complex text data; it’s done for you.

5. Save the Record: Simply click “Save” or “Add Record” to create the DMARC record. Your DNS settings are now equipped with the necessary DMARC protection.
Step 4: Confirm Changes
Verify the changes you’ve made, and rest assured that your DMARC record is actively securing your email communications.
Method 2: Manual DMARC Configuration (for Full Control)
For those who prefer manual DNS configuration, here’s how to add a DMARC record:
Step 1: Access Your DNS Manager
Before you can add a DMARC record, you need to access your DNS manager. Depending on your hosting provider, this can be found in your hosting control panel, domain registrar’s website, or a dedicated DNS management platform.
Step 2: Locate the Zone Editor or DNS Management Section
Once you’re logged into your DNS manager, look for the “Zone Editor,” “DNS Management,” or similar section. This is where you can manage your domain’s DNS settings.
Step 3: Manually Adding the DMARC Record
Here’s how to manually add a DMARC record:
1. Select “Add Record” or “Create DNS Record”: Start by clicking on “Add Record” or a similar option. This is typically represented by a plus sign or an “Add” button.
2. Choose “DMARC” as the Record Type: In the record creation process, select “DMARC” from the available record types.
3. Configure the DMARC Record:
- Name/Host/Alias: Specify the domain or subdomain for which you’re setting up the DMARC record. Typically, use “@” for the root domain.
- TTL (Time To Live): You can usually leave this at the default value.
- Type: Set it to “DMARC.”
- TXT Data: Enter your DMARC policy as a TXT record, typically in this format:
v=DMARC1; p=none; sp=none; adkim=r; aspf=r; pct=100; fo=0; rf=afrf; ri=86400; rua=mailto:[email protected]Key components include:
v: DMARC version.p: DMARC policy – “none” for monitoring-only mode, or choose “quarantine” or “reject” for stricter actions.rua: Email address for DMARC aggregate reports.ruf: Email address for forensic (failure) DMARC reports.fo: Failure reporting options, often set to “1” for generating failure reports.aspf: Align the Sender Policy Framework (SPF).adkim: Align the DomainKeys Identified Mail (DKIM).
4. Save the DMARC Record: After entering the required information, save the record to create the DMARC entry in your DNS settings.
Step 4: Confirm Changes
Verify the changes you’ve made, and your DMARC record is now actively securing your email communications.
Why DMARC is Crucial
Now that you’ve successfully established your DMARC record, whether through UnivaHost’s cPanel or manual configuration, let’s explore its significance:
- Email Authentication: DMARC ensures that only legitimate senders can use your domain in email headers, minimizing email spoofing and phishing risks.
- Email Deliverability: It enhances the deliverability of your genuine emails by establishing trust with email service providers.
- Reporting: DMARC offers insights into email delivery, failures, and suspicious activity via feedback reports, enabling you to monitor and combat unauthorized domain use.
- Brand Protection: DMARC safeguards your brand’s reputation by preventing domain impersonation.
With options for automatic or manual DMARC configuration, securing your email communications is now more accessible than ever. By following these steps, you’ve taken a substantial step toward preserving the trustworthiness of your domain and ensuring your emails are delivered securely.
Video Tutorial: Setting Up DMARC for Email Security
To complement this guide, we’ve prepared a video tutorial to walk you through the DMARC setup process step by step. You can watch the video below:
Don’t delay—reinforce your email security and ensure trusted email delivery with DMARC. Your recipients will thank you for it.

Very Helpful